DLL Errors

Best Practices For Dealing With DLL Issues

A recent survey on computing practices of home users and small businesses revealed that over 65% of computer users have very little idea about preventing or fixing computer errors themselves. They simply assume that computer errors are beyond their comprehension and the only solution is to send their PC to an expert. They do not have any strategy in place when it comes to preventing and fixing PC errors. For these users, preventing errors usually means installing an anti-virus and fixing means calling the expert. Only 14% of computer users troubleshoot computer errors themselves on a regular basis and rarely approach computer experts.

However, it is high time that all users are made aware of the fact that solving computer problems is not rocket science and a majority of problems can be solved easily if we adopt certain practices. This article enlists the best practices that will help you deal with common computer issues known as DLL issues.

One of the most common DLL errors that you may face is the missing DLL file. There can be several causes of missing DLL file errors. Discussed below are some of the common causes of these problems and the steps to perform DLL error fixes.

You delete the DLL file by mistake. To resolve this issue, you first need to check your Recycle Bin to see if the file is there. You may also perform a thorough system search to ensure that the DLL file in question has not been moved to another location by mistake. If you find the file, restore it to its original location on the disk to resolve the errors.

A buggy application or device driver is installed. If you like to download and install software and games from the Web, chances are quite high that you will install a buggy software that starts generating errors on your computer. To prevent this situation, you must always install only well-tested software downloaded from trustworthy websites.

Your computer is infected with some type of malware: Malware programs may copy malicious DLL files, such as the bridge.dll file on your computer. Such files make your computer behave erratically. To get rid of malware, it is essential that you have the latest antimalware tools with the capability to perform a thorough scan of your computer and get rid of any virus and spyware data added to it. To ensure the efficiency of the scan, it is essential that you keep your antimalware tools up-to-date with the latest malware database. It is best that you choose a tool that provides the automatic database update feature.

Windows operating system, applications and drivers on your computer are outdated: Software manufacturers release regular updates to incorporate new features in their products and patch up any bugs or security vulnerabilities. Many computer problems, such as high CPU usage by hpslpsvc32.dll and svchost.exe files and computer errors occur if your files are outdated. To update your Windows and other Microsoft-related products, you just need to enable the Automatic Update feature in Windows. To update your drivers, you may opt to use an automatic driver update utility.

Windows registry is corrupt or damaged. Problems in the Windows registry are also known to generate DLL issues. This is the reason why experts recommend that you use a reliable registry tool to perform regular scans of your registry to keep it free from any kind of problem.

PC Email Errors

PC Email Errors

In this article, we will discuss the following topics:

•  The name and purpose of three common file types associated with e-mail client programs,     such as Microsoft Outlook.

•  Steps to resolve common file type errors.

Common e-mail file types

.nk2 file extension and its purpose

An .nk2 file is commonly referred to as Outlook’s AutoComplete file. Outlook is a popular e-mail program from Microsoft. The .nk2 file format was first introduced with Outlook 2002 and since then has become an important component of the Outlook application.

The .nk2 file is used by Outlook to store details about the e-mail addresses to which you have sent e-mails. Outlook’s AutoComplete feature works in conjunction with the .nk2 file to help a user when he/she types an e-mail address or recipient’s name in the To, Cc, or Bcc field. For instance, when you type a letter, say ‘a’ in the To field, the AutoComplete feature refers the information stored in the .nk2 file and displays all the e-mail addresses starting with the letter ‘a’ to which you have previously sent an e-mail.

.idx file extension and its purpose

.idx files are index files that are used by various applications, including Microsoft Outlook Express. The .idx files store an index of mail messages and are used when you import old Outlook Express mailbox into Outlook Express version 5 or later.

.nick file extension and its purpose

A .nick file is commonly referred to as an Outlook 2000 Nickname file and these files allow you to designate a string of characters as a nickname of an e-mail address.

Resolve file type errors

In case you receive an error, such as ‘Windows cannot open the file’ when you try to open a file, then either the program required to open the file is not present on your system or the file in question is corrupt.

To fix the issue, you need to identify the program with which the file opens and install it on your computer. If the error persists or you already had the required program, then we recommend you use a reliable file extension repair program to help you open the desired file.

In case the file type error occurred while opening an application then plausible causes include: a poorly installed application, malware infection or registry errors. To fix the error in such cases, perform the following steps:

Step #1 – Uninstall and re-install the program with which you are receiving the error

Using the built-in Add or Remove programs utility, uninstall the application that is generating the error and reinstall it. If the error persists, move to the next step.

Step #2 – Perform a malware scan

Update your security software with the latest malware definitions and security updates and run a malware scan on your entire computer. To ensure all residing threats are aptly removed, you may run the malware scan twice.

Step #3 – Perform a registry scan

Using a professional registry cleaning software, perform a registry scan to fix registry errors and restore the integrity of the data stored in your registry.

Common File Extension Errors

Common File Extension Errors And How To Resolve Them

Is your computer screen flooded with a myriad of file error messages?

Are you unable to open a particular file on your computer?

Are you unable to launch an application because one or more application files are either missing or corrupt?

If you answered YES to any or all of the above questions, then what you require is not a computer expert’s help but the simple steps provided in this article to get rid of your computer woes.

Errors related to different types of file extensions such as the .pgm file extension, .asp file extension, and the .ex_file extension can cause great discomfort by preventing you from opening/editing/saving/converting an important file. Further, file extension errors may prevent you from launching the software to which the faulty file is a part of. The comfort comes from the fact that file extension errors can by easily resolved.

The purpose of this tutorial is to equip the average Windows user with the means to tackle irritating file extension errors on their own.

Perform the following 3 steps to troubleshoot file extension errors:

•  Use a file extension repair software – If you are unable to open a particular file then it is recommended that you seek the services of a reliable file extension repair tool. These tools are quite easy to use and facilitate easy opening of various file types by fixing the file ‘openers’ on your Windows computer.

 Run a malware scan – If the file extension error is of a serious nature, for instance if the error message hints that one or more files are corrupt or damaged, then it will be prudent to run a thorough malware scan.

Malware programs are notorious for corrupting and deleting essential files and causing various errors, including file extension errors. The remedy in such a case is simple. Restart Windows in Safe Mode and perform a thorough malware scan. The steps illustrated below show you how to restart Windows in Safe Mode.

1. Quit all the running programs and restart your computer.

2. As Window reloads, press and hold the F8 key.

3. Select the Safe Mode option in the Windows Advanced Options Menu, using the arrow keys and press Enter.

After you have quarantined or deleted all reported threats, do not make the mistake of lowering your guard. In the future, prevent re-infection by regularly updating your security tool and scheduling regular malware scans.

Clean your registry – Although this point is mentioned last, do not let that dilute the importance of a clean registry.

Did you know that the majority of file errors occur due to incorrect file associations?  Yes, that is right. And errors in the registry are the biggest cause of incorrect file associations on Windows computers.

The solution is fairly straightforward – use a reliable registry cleaning tool to clean your registry. You will be pleasantly surprised to find out how easy it is to clean your Window registry and perform other registry maintenance tasks with the help of a good registry cleaning tool.  All you need to do is click your mouse a few times. The benefits of a clean registry are aplenty – the most noticeable benefits include faster computer speed and the disappearance of errors, such as file extension errors.

Perform the above 3 simple steps to get rid of file extension errors for good and enhance your computing experience.

Creating and Burning DVD or CD

Creating DVD or CD’s with Ease Using Nero

There was a day when creating a data disc was a daunting task, but now things are so much different with technology becoming more and more friendlier to use. Now,  there are so many reasons why one may want to create customized media.  Here are a few just to name off:

•  Custom Music Mixes

•  Picture Albums: Weddings, Parties, Memories, Etc.

•  Data Backup

•  Presentation (Business, and maybe even with a LightScribe Label.)

•  Home-Made Movies and Editing

So with that said, you can see that there are many uses for burning discs, but the question that always is asked is how, and how hard is it to learn?  To answer this, you really simply need to have simple software.  Back in the earlier days of burning discs, things were difficult to keep compatible with players and even sometimes other computers, but today things are much different.

Enter Nero, Nero is a very user friendly and robust burning authority program.  I have personally been using it since 2001 and have loved all the upgrades along the way.  Today, Nero has so many functions, truthfully I don’t even use all them, but it is nice to have if I would ever need to.  If you are looking for an all in one stop, that will not rob the bank, but give you the tools you need to get the job done.

Nero Highlights:

•  Faster One-click Rip, and Copy functions

•  Backup data to CD, DVD, and Blu-ray Disc

•  Organize and edit your photo library, then add music to create amazing slide shows.

•  Burn video DVDs with HD quality.

•  Enjoy Live and recorded TV

•  Remove commercials from recorded TV broadcasts with one click

•  Share video or music to YouTube™, MySpace® and My Nero, or enjoy on your iPod® or other portable device

•  Play AVCD and other HD format support (Blu-ray), plus stream to Xbox & Playstation.

Computer Fans and Cooling Importance

Computer Fans and Their Importance: Cooling a Computer

computer fansProbably the most overlooked component inside of any computer (laptops and desktops alike) are the fans.  These devices are very inexpensive, however if they fail can lead to a very expensive repair.  In this article we will cover what computer fans are, their function, and some general maintenance that should be done.

Purpose of a Fan:

The primary purpose of a computer fan is to keep a computer cool.  CPU’s and other chips inside the computer can become very hot, in fact hot enough to fry an egg or even hotter.  So keeping the air flowing is critical, unless the system uses a liquid based cooling system (we will not be discussing liquid cooling in this article.)

Types of Fans:

•  Power Supply:  Most PSU’s (Power Supply Unit) come with one 90mm or 120mm internal fan, however some power supplies (recommend) have two, one intake and one out-take.  It is very important to keep a power supply cool as it will prolong the life of the power supply.  A power supply that needs this type of cooling that does not have an operating fan can reduce it’s life significantly, because it will only be a matter of time before things get too hot inside that little box for components to melt or even explode due to heat.

•  CPU (Central Processing Unit):  It is very critical to have a well working and operating fan on this component.  Most modern CPU’s range from 35 degrees Celsius to 75 degrees Celsius (or 95F to 167F.)  So, keeping the heat moving off the heat sink is essential.  Never let a CPU go without an operating fan that a heat sink requires.  Most CPU thresholds are 80 degrees Celsius before physical failure begins, which can further damage a motherboard and connected components.

•  Chipset:  Some motherboard chipsets come with fans and others have passive heat-pipes.  I prefer the passive heat-pipes over fans, however don’t be fooled by the importance of these tiny little fans.  When they fail, the most common problem that arrives is system halt blue screens or also known as the blue screen of death (BSOD).  The system chipset needs to stay cool just as much as the CPU does, period.

•  GPU (Graphic Processing Unit):  These fans can be found on the medium to upper end video cards.  Much like the CPU Fan, all the above applies.  If you want to keep your games running smooth without artifacts and other anomalies, then keep your video card chilled as much as possible.

•  Case (chassis) Fans:  Not all system setups need or come with case fans, but I would never recommend it.  Relying on your systems power supply to cool the inside temperature of the case is not going to work effectively. Case fans can come in all different sizes varying on the style of case.  Having a minimum intake and out-take fan in place will make a big difference in your setup as long as the room temperature is less then the temperature inside the computer.

•  There are other supplemental fans that can be installed such as hard drive, CD style (front of case), and PCI slot (great for helping CPU’s and video cards.  These fans are typically more optional and not mandatory than the above fans, but will add some degrees in differences.  Every degree counts inside of a computer.

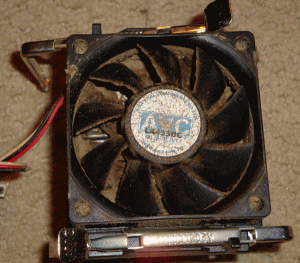
Because of dust, animal hair, cigarette smoke, factory air, etc. fans aren’t entirely maintenance free.  Depending on the environment, will depend on how often you clean the fans and alike components.  Be sure to stop by our “How to Keep a Computer or Laptop Dust Freepage for preventative maintenance and cleaning tips.  Fans are typically rated between 50,000 to 80,000 hours (that’s between 5 1/2 years to 9 years of continuous use.)  While this number almost rarely is achieved because of environmental variables such as the above, it isn’t too far off if they are well maintained.  Unfortunately fans will fail before their time.

Replacement:

When replacing fans, be sure to replace with a good brand and a quite one.  We recommend Vantech Stealth Series fans.  They are very quite and run up-to 3,000 rpm’s.  They don’t sound like jets taking off in other words.  However when you need more air flow, you will have to sacrifice some noise.  Gaming rigs need this kind of air, so noise reduction will become a challenge with fans in the mix, unless you go with liquid based cooling.  Don’t forget if you are adding more fans than your system originally had, be sure your power supply has enough output to supply for the additions.

Cleaning LCD & LED Screens

Cleaning Screens: Right & Wrong Ways, LCD & LED

You may not be aware that there is a right and wrong way to clean a LCD screen, but there is.  There a few common mistakes that users make when they clean their LCD screens.  Below is a list, and the following is why.
•  Using Water

•  Using a normal towel, rag, or paper towel

•  Pressing hard on the screen’s surface

•  Using a window cleaner (such as Windex)

LCD screens are sensitive to all the above.  Non of them should be used for the following reasons:

•  Water:  Being that most of the country (USA) used well water, we all understand and know that there are many potential natural impurities in the water like iron, calcium, lime, etc.  So, using this on a scratch sensitive screen would be a really bad idea.

•  Towels (including paper) and rags:  Can be abrasive, as the same with water, it can leave scratches.

•  Pressing hard on the surface:  LCD’s are liquid, and if the liquid is dispersed too much, it will permanently damage the screen.

•   Window Cleaner:  Is meant for glass, not an LCD screen.  It is possible to bring more harm to the screen by creating a permanent haze over the screen using window cleaner.  While this may not happen to all LCD screens it can happen to some.

The right way to go about cleaning a LCD screen is to use a commercially (specifically made) product for LCD care using a lint free cloth in a gentle circular pattern while the screen is off.  The screen can be on while cleaning, it just makes it a bit more difficult to see what it is that your trying to clean off.

LCD Cleaners are safe, scratch-free cleaning for virtually all LCD displays. Because LCD surfaces are especially susceptible to scratches, you need a top-quality cleaner that won’t damage your screen.  Television sets, laptops and PCs demand special attention that only a quality cleaner can provide, and safely.

How Cigarette Smoke Damages a Computer

How Cigarette Smoke Damages a Computer

no smokingFor all the smokers out their that think smoking in front of the computer is okay, this webpage is for you.  I personally do not smoke, however have seen many times over how this habit brings a computer to an early grave.  Below, I will be focusing in on the heat sink of the computer.  A heatsink and the fan that sits on top of it has one primary duty.  That is to keep the central processing unit cool (CPU.)  If the CPU overheats or runs hot it can burn out or destroy a motherboard.  In the case below, it assisted the motherboard to an early death along with itself.  The images below are fairly large for dial-up users, so please be patient.

Heatsink_smoke_fan

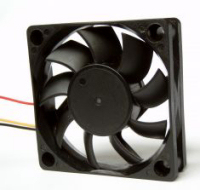
The picture above is a aerial view of a 3 year old computer system.  What you are supposed to see is a heat sink below the fan that is similar to the aluminum grill to the right.  What most people don’t realize with cigarette smoke is that it is very moist in nature.  Along with this it collects any air born particles as well with the chemicals inside the cigarette.  Mixed with the hot air and heat from electronics, it will become like glue to what it sticks to as you can see in the image above.

Heatsink_smoke_fanless

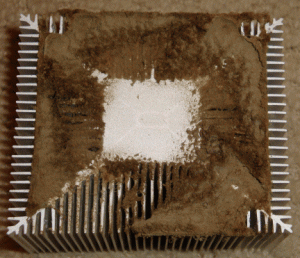
Above is a picture of the heatsink without the fan.  Disgusted yet?  You should be!  As you can see, the smoke has created a thick (sticky) blanket of soot over the grills.  This causes a choking effect on the CPU’s ability to ventilate.  As the heat rises to the top of the heatsink, the fan will not be able to properly disperse of the heat.  Thus, causing the heatsink to return the heat to the CPU.  This cooling method is like that of a car without the water coolant.  Try running your car without the fan behind the radiator.  It will not be long before it over heats and causes a lot of damage.

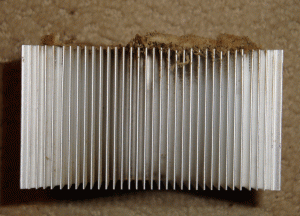
In the image below on the side shot of the heat sink you will see that the build up is about 1/4″ think in some areas.  Though this doesn’t sound like a lot, it is to a computer.

Heatsink_smoke_side

So, what do you do if you smoke?

Don’t smoke around or near the system.  Keep the system in an area that is a smoke free environment if at all possible.  Below are some other contributing factors to particle buildup in a computer.

     •  Pet hair

     •  Industrial (factory) airborne particles

     •  Living in the city beside busy roads

     •  Living in the country with dusty fields

     •  High humidity in combination with any of the above.

     •  Baby Powders (or the like)

What should be done if any of these cannot be avoided?

If you are in an environment that none of this can be avoided, or the damage has already occurred, then it is best to have your computer cleaned on the inside.  I have seen this done as often as once a month to every 6 months.  Every circumstance varies, so it will depend on your situation as to how often a system should be cleaned out.  If you are not comfortable with cleaning the components of your system, call a local technician like us (RCCS) to do the job for you.  They shouldn’t charge any more than a service charge (hourly rate) or maybe a flat fee.


How to Keep Computer Dust Free

How to Keep a Computer or Laptop Dust Free?

Dusty RoadKeeping a computer or laptop dust free is as much of a challenge as keeping weeds out of the garden.  While this may sound next to impossible, there are some basic preventive measures  the user can take to help keep the inside of a computer free of dust or at least keep it to a minimum.  First let’s see what bad things dust does to a computer.

•  Clogs vents (fans, heat sinks, power supplies, etc.) which leads to over heating and eventually hardware failures.

•  Dust can hold moisture, moisture can cause short circuits, which means you can say goodbye to the computer eventually.

•  Laptops often overheat due to dust clogged in it’s CPU heat sink.

Where Does Dust or Foreign Objects Come From That Get Into a Computer?

•  Plants

•  Animal’s hair and dander

•  Cigarette or Cigar  Smoke

•  Road Dust (Often from city traffic or if in the country, likely from farm fields)

•  Sand (desert conditions)

•  Factory by products such as metal shavings, wood particles, etc.

•  Grease (just don’t have your computer in your family kitchen, period)

video capacitor blown

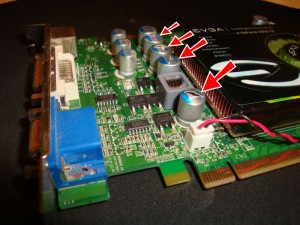
Example of what can happen to computer components as seen to the right is when vents get clogged, electronics will begin to overheat.  A component can only take so much heat, so eventually something will have to give.  Many times what gives will be capacitors.  In the case of the picture to the right, this is a video card that overheated and capacitors began to pop. When they pop, they sound like .22 cal bullets being fired.  This particular video card overheated due to common household dust being collected in its vents over a 2 year period. While it was a simple thing to replace the card, the electronic explosions can  potentially cause data lose and of course loss in productivity when you can not use the computer until it is fixed.  Problems such as this can intermittently work will having the blown capacitors for a little while, but eventually will lead to blue screens, boot failures, then eventually the system will not power on.

How do I keep my computer clean?  There are a few preventive measures you can do before you dust out your system.  RCCS has been to many different places with different environments.  Some places are oddly clean to where the 5 year old computer that has never been opened and is completely clean to the opposite extreme where we thought we were going to be attacked by the particles.

Preventative Measures:

  • Don’t expose your system to harsh environments like in the above list.
  • Don’t smoke at or around the computer.  Smoking is the worst for killing a computer prematurely.
  • Keep the computer off the floor and preferably away from carpet or dust collecting areas.
  • Keep the computer away from forced air heating or air conditioning.
  • Install an air filter into or around the computer. Alternative a computer could be installed into a controlled environment (clean room, very expensive.)
  • Keep animals away (Typically next to impossible with cats and dogs.)
  • Easy way out:  Air Purifier!

How often a computer is to be cleaned depends on your situation and environment.  Some computers due to their harsh environments may need cleaned out weekly where others are every 6 months to a year.  It really depends on your environment.  A rule of thumb is if you see dust mounding around your exterior vents, power supply, and/or connections, then it is probably time to clean up the inside.

When cleaning out a computer it is best to use compress air to blow out the loose dust.  Do this with the computer unplugged and powered off for at least 30 minutes.  If the compressed air would to happen to blast freeze condensed air onto a hot chip it will crack it and destroy the electronics.  Laptops must be cleaned from inside out as well.  Do not think that blowing air into any computer will help, because it will not.  It will only cause more room for new dust to build up.  If you are not comfortable with cleaning the inside of your computer, then have a professional come and help you.  Other forms of foreign substances such as cigarette smoke is very sticky and can not be just blown off.  This will need to be removed with isopropyl rubbing alcohol by a technician unless you have been trained in doing so.  Computer and electronics are sensitive to static electricity, so be sure you are grounded anytime you are going to be coming into contact with the insides of a computer.

Computer Turns Off On Own

Computer Turns Off On Its Own

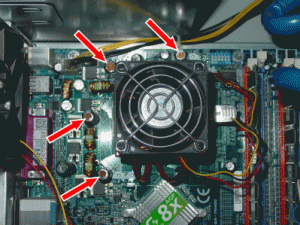
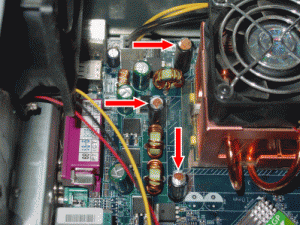
It isn’t always the power supply that causes a computer to not turn on or stay on.  Problems can be at the physical hardware level on the motherboard.  Below you will see pictures showing images of an older AMD Socket A motherboard with leaking, bulging capacitors.  The owner of this board described the problem as he would turn on his computer, it would barely get to the Windows welcome screen and then just freeze.  The problem continued to get worse, eventually the system wouldn’t get past the BIOS screen, and then it just would not power on.

So What Causes Capacitor Failure?

Motherboard2

Leaking and bulging motherboard capacitors around processor. Leaking and bulging motherboard capacitors around processor.
•  The chemicals inside a capacitor is producing gas, hence causing them to bulge and leak.  It could be a bad capacitor from the factory.  If you device (motherboard, video card, power supply, etc.) is under warranty, be sure to contact the manufacturer to see about a replacement.

•  Power spikes and surges, over charging of the capacitor.  Capacitors can literally blow up.  This is rare, but does happen often when associated with electrical surges.  The sound is likened to a pop that can be as loud as a .22 cal. rifle or a low muffled pop like a bottle full of just plain air thrown into a fire.

•  Conditions are too hot.  If a computer is in a harsh environment (look at your manufacturers specifications for exacts) this could lead to an early death of any capacitor.

•  Moisture, humidity like the climate description above can play havoc on any computer equipment that is not designed to resist water/humidity causing short circuits and electrical surges.

Symptoms of Capacitors Gone Bad:

•  System isn’t booting past post or barely making it into the operating system before it freezes.

•  A device like a CD/ROM cause the computer to reboot or shut off when access.  System freezes, blue screen, and/or turns off when using a high demand on resources application.

•  Sudden and random shut downs (system abruptly turns off).

•  System is running noticeably slower than you ever remember.  You know there are no virus’, spyware, and the hard drive is fine.  If you suspect that your problem is software related, you can verify it by running a free scan from Uniblue using their Registry Booster.

•   Windows producing a Blue Screen of Death for no apparent reason (unrelated to drivers).

How do I Prevent Capacitor Failure?

There are only a few prevention methods, however sometimes it still cannot be avoided.

•  Room temperatures should be between 60F and 75F.  If higher than 75F, be sure to provide lots of cool air flow into the computer and a hot air escape from the system tower.

•  Keep room temperatures between 60 F. and 75F ideally.   Relative humidity should be  low but not absent, between 35% – 45%.  Humidity can be bad for your health as well as a computer.  Mold likes to grow in high humidity climates.  Water likes to condensate in high humidity.  In low humidity environments, static electricity is common.  One good zap to the right electronic components inside a computer will bring it to its knees.  Water and electricity just don’t mix, period.

•  Surge protector and battery backup:  As high a joule rating as you can afford and backed by a battery backup unit UPS (Uninterrupted Power Supply) to keep power from turning off abruptly and remain running until it can be properly shut down or resume A.C. power.

Can’t I Replace the Capacitors Instead of the Entire Motherboard or Component?

Yes, it is possible if you have a bit of soldering know-how and match the capacitors exactly with the same specifications as the ones that you are replacing.  These days though, it more likely to be cost effective to just outright buy a new motherboard than the cost incurred from replacing the capacitors (time, parts, technician, etc).  Ryan’s Computer Consulting Services replaces motherboards occasionally due to bad capacitors.  If you are tech savvy and are in the market for a new motherboard we recommend checking out Tiger Direct.com.

Power Supply Failure Symptoms

Power Supply Failure, Noises, Computer not Turning On?  

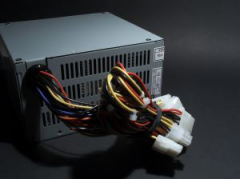
PSUPower supplies like hard drives will fail eventually. Power supplies however almost never give any warnings that they are about to give up other than the computer just not turning on.

Power supply failure early symptoms:

•  There are strange noises coming from the back side of the computer where the power cord plugs into the power supply.

•  Nothing happens when the computer power button is pressed.

• The computer turns on for a few seconds and then turns off.  (Sometimes this is unfortunately associated with motherboard failures.)

•  Computer turns on for a while, but when games or other applications are using the computer steadily, it will turn off or I get a blue screen.

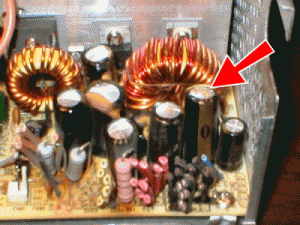
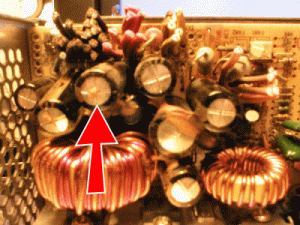
Some of the most common issues with power supplies is bad leaking capacitors.  This same issue can happen on a motherboard as well.  Capacitors can blow, bulge or leak caused by many things such as:  power spikes, power outages, and age to name a few.  Below are a couple of pictures of bulging and leaking capacitors.  I cut away the wires inside the power supply to make things a bit easier to see.  Never take a power supply apart, it is dangerous and you risk electrocution, even if the power supply is unplugged.  Capacitors are made to hold high amounts of electrical charges.  The human body only needs 1/8 of an amp to stop your heart.  Power supplies on average produce 10 – 30 amps, while even higher models go up to 100 amps.

Capacitor2

Capacitor1 Capacitors are leaking brown goo from the center of the plus sign above. The other ones are bulging.

The power supply above caused the computer it was in to immediately turn off when the user inserted a CD into a CD/ROM drive.  It was not able to supply adequate power to all the components in the computer so it browned out, or as the user would say, just rebooted without warning.  Power supplies are common to fail, if you are comfortable in opening your computer and replacing your power supply, we recommend “PC Power & Cooling” brand power supplies.

If you have any of these symptoms, it would be a good idea to have the system checked out. Frequent power supply failures will ultimately lead to further system damage and/or data corruption, which will cost you more hard earned dollars in the long run.